
|
Workshop on the
preparation of web-based lecture support materials
Author
Paul
Kenyon
Workshop
#1: "The image in web-based learning: From static to interactive image"
Led
by Dr Paul Kenyon, University of Plymouth
Learning aims: This
workshop is designed to show participants how to prepare static and
animated images for use in web-based teaching and learning. In
addition, the workshop will describe how to use DHTML and JavaScript to
develop web-pages that allow the user to control the progressive
display of elements in a complex graphic containing the results of an
experiment with several experimental conditions.
Learning
objectives: After attending this workshop participants
should be able to:
- Name
at least two ways of obtaining images for web-based teaching
- Use
Excel to produce a chart illustrating a set of experimental results
- Use
Macromedia Fireworks to edit a chart
- Animate
a set of image frames using Microsoft GIF Animator
- Explain
the advantage of frame interpolation in animation construction
- Explain
the advantages and disadvantages of animated images
- Use
DHTML to control image position on a web page
- Use
JavaScript to allow the user to control image display on a web page
Introduction to learning
activity 1
The
educational
rationale for adding animated images to a web page.
A
superficial glance at any psychology textbook reveals that many
concepts and experimental findings can be presented visually.
Conventional textbooks are richly endowed with static
images which have made a significant contribution to the education of
generations of students. But as this workshop
progresses I hope you will appreciate how the Web enables us to deliver
interactive images to enhance students'
ability to
comprehend complex graphical representations of experimental results.
Although
I teach physiological psychology, and the examples are drawn from this
area, the workshop is designed for lecturers in any area of psychology.
Psychology
lectures usually involve presenting the results of experimental
investigations in the form of bar or line charts. Therefore this
workshop concentrates on the steps involved in preparing charts
for web delivery.
|
|

This web
page contains examples of interactive and static images.
Today's
LTSN workshop is designed to introduce you to the techniques used to
contruct this web page.
Hopefully
you will be able to apply these techniques to enhance your own teaching
materials.
Acquiring
images
Scanning
is the easiest way to acquire an image. But the results are seldom
satisfactory, and may involve violation of copyright.
Alternatively
images can be created from scratch with relatively little effort. The
first hands-on activity involves creating a chart in Microsoft Excel.
| Example of scanned image |
Example
of image created in Excel & Macromedia Fireworks |
 |
 |
Hands-on activity 1
| Tip
- Do not worry if you fail to complete part(s) of any Hands-on
activity. I have put hypertext links on the files referred to on this
page so that you can download a file and skip parts of the exercise if
you wish. To save a downloaded image simply right click on it and you
will be given the opportunity to "Save As ..." |
| Action |
Screen display |
|
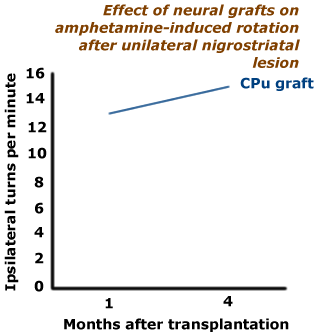
The
file 'raw_data_day1.xls'
(in the LTSN
resources folder) contains simplified raw data from an
experiment described by Dunnett (1989) on the effect of various neural
grafts on amphetamine-induced rotation after unilateral nigrostriatal
lesion. The data has been used to create a simple line graph showing
the performance of five independent groups of animals. You can use this
file for today's activities.
Create
a simple line chart of the results as follows:
- highlight
the group names and data values by clicking on the 'intact' cell, keep
the left mouse key depressed and drag the mouse to the
bottom right cell which contains the value 15
- click
the chart wizard icon
 in Excel's
toolbar in Excel's
toolbar
- follow
the suggested steps to recreate the chart, or make your own
modifications
Feel
free to modify the data in this file, or use your own data set to
create a chart
|
 Tip - Put a piece of paper
over a chart to help read the X,Y values of each data point. Tip - Put a piece of paper
over a chart to help read the X,Y values of each data point.
Using
transparent overhead slide medium instead of paper helps when dealing
with complex charts.
|
|
 |
| Action |
Screen display |
| Select the chart by
clicking on the white area within the chart. A series of small closed
black squares indicates that the entire chart has been selected.
Copy
the chart onto the clipboard (a storage area within computer memory) by
either clicking on the Copy icon  in the
Excel toolbar, or by selecting Edit, Copy from Excel's drop down menu
bars at the top of the screen. in the
Excel toolbar, or by selecting Edit, Copy from Excel's drop down menu
bars at the top of the screen.
Copying
onto the clipboard enables us to load the chart image into another
application for further editing and conversion into a GIF image that
can be displayed by a web browser.
|
Tip
for the adventurous, or experienced Excel users.
It
is possible to generate GIF images in Excel by using File, Save as HTML
which launches the Internet Assistant wizard. The wizard allows you to
create a web page containing the chart as a GIF. If you follow this
route you can use this GIF for the exercises referred to in Using Macromedia Fireworks to enhance
images
You
may decide that Excel allows you to achieve the same effects as
Fireworks. Feel free to use Excel - or your favourite graphics program
- instead of Fireworks. I tend to use Excel to create a template that
can be enhanced in Fireworks.
At
some stage you will need to create charts with a transparent background
- You can create transparent GIFs in Excel, but I resort to Fireworks
for this feature.
|
|
 |
At this
stage we have a copy of our Excel chart saved on the computer's
clipboard. We are going to enhance this image in Macromedia Fireworks.
Unfortunately the version of Fireworks I use (Fireworks Version 1) will
not allow us to Paste the contents of the clipboard into the workspace.
If you have a later version of Fireworks which supports this feature
you can skip the next step and jump straight to Using
Macromedia Fireworks to enhance images
To
circumvent this problem with Fireworks version 1 we can use Microsoft
Paint to retrieve the image from the clipboard, and save it in a
filetype that can be opened by Fireworks. Yes, it's a 'kludge', but
nevertheless very useful. This 'kludge' illustrates an important point:
Get to know the capabilities of the software you use. This information
can be useful if you are faced with an unexpected problem. I personally
prefer to work with a set of fairly old software that I know my way
around rather than trying to learn the ins-and-outs of the latest
'gee-whiz' products.
| Action |
Screen display |
|
Launch
the Microsoft Paint application. Click the Windows NT Start button at
the bottom left of your screen then select Programs, Accessories, Paint
Note
that your screen display will not look the same as mine (cluttered ...)
|
 |
| Action |
Screen display |
- Paste
the chart created in Excel from the clipboard into Paint (use Edit,
Paste).
- Save
the image as raw_data.bmp
(use File, Save As...)
- Close
the Paint application (use File, Exit)
|
 |
Using Macromedia Fireworks to
enhance images
Although
Excel can be used to create simple graphs that convey the data,
Fireworks and similar packages, open up a greater range of design
features. Fireworks is a Web graphics application that enables precise
control over the appearance and orientation of elements in a chart.
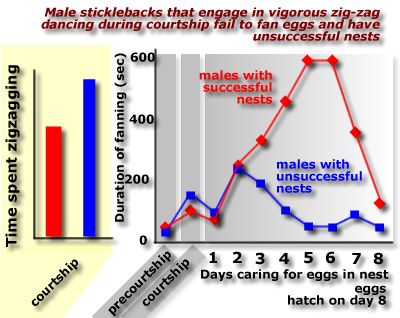
| Fireworks exports jpg
images as well as gifs which can be useful if you want to capture a
subtle change in a background fill used to convey change over time. For
example, in this image the grey panel behind the data fades to white to
convey the passage of time. The transition from grey to white is
preserved in a jpg file, but is converted to a series of stripes when
the image is saved in GIF format. |
| JPG image |
GIF image |
 |
 |
| Tip
-Feel free to use your preferred graphics package for this exercise if
you know how to use it to create the type of effects shown in this
illustration. |
| Action |
Screen display |
|
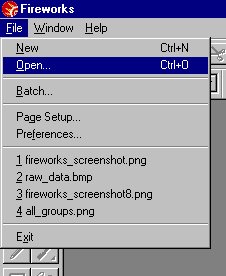
Launch
the Macromedia Fireworks application.
Use
Firework's File, Open.. menu to open raw_data.bmp in
Fireworks (File, Open)
|
|
| Action |
Screen display |
|
Set
Fireworks' View, Magnification to 100%.
|
 |
| Action |
Screen display |
| Explore the
FireworksText Editor.
Click
the  icon, then double click on
chart to open the Text Editor tool. icon, then double click on
chart to open the Text Editor tool.
Create
a title, X and Y axis labels for your chart.
Use
the mouse to drag labels into position on the chart.
|
Supplementary
activity
If
you have the time and inclination, explore the use of the options in
Firework's Text Editor to change the font and size of your text.
|
|
 |
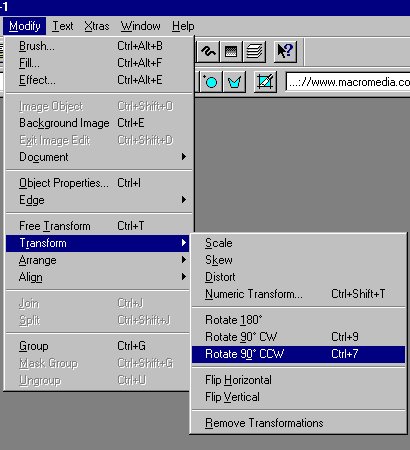
| Action |
Screen display |
|
The
Modify, Transform menu is used to rotate text. For example Rotate 90
degree counter clockwise (CCW) is used to orientate the Y axis labels
in the chart.
|
Supplementary
activity
If
you have the time and inclination, you may want to add drop-down
shadows effects to the text in your chart
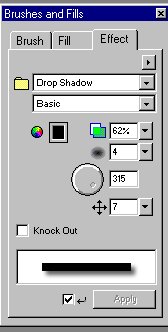 3D effects can be created by using the Drop
Shadow feature in the Brush, Fills, Effects menu. 3D effects can be created by using the Drop
Shadow feature in the Brush, Fills, Effects menu.
|
|
 |
| Action |
Screen display |
|
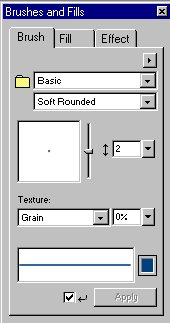
Select
Window, Brush from Fireworks' drop down menu bar to launch Firework's
Brush & Fill tool.
Use
a Basic brush, Soft rounded line with Brush tip size set to a value of
2.
Use
the line tool  to add lines showing the
performance of each group to your graph. to add lines showing the
performance of each group to your graph.
After
you click on this icon the cursor changes to a cross:
- Position
the cursor at the start of the line you want to draw.
- Click
the mouse button and drag the mouse so that the cursor is over the spot
marking the end of the line you are drawing.
- Release
the mouse button.
|
 |
| Action |
Screen display |
Use
the Select tool  to select
each line in turn. (This will load the line's colour into the Brush and
Fill icons). to select
each line in turn. (This will load the line's colour into the Brush and
Fill icons). |
|
 Change
the colour setting for each line by double clicking on the colour
sample beside the brush and paint pot icons. Change
the colour setting for each line by double clicking on the colour
sample beside the brush and paint pot icons.
Select
a new colour fromn Fireworks Basic Colors
|
| Use
the Text tool to create coloured labels for
each line. |
|
 |
| Action |
Screen display |
- Use
Select, All from Firework's drop-down menu to select all the elements
you have created.
- Use
the copy icon
 or the drop-down menu commands
(Edit, Copy) to copy these elements onto the clipboard. or the drop-down menu commands
(Edit, Copy) to copy these elements onto the clipboard.
Create
a new blank image using File, New from Firework's drop-down menu.
Accept the suggested dimensions (= size of raw_data.bmp) for this new
image.
- Paste
 (or Edit, Paste) all the
elements you have created onto this new image. (or Edit, Paste) all the
elements you have created onto this new image.
- Save
this image with the filename all_groups.png
Note
.png is Fireworks' default file extension
|
 |
You are
now going to create five separate images. Each image will contain the
results from just one group within the experiment.
| Action |
Screen display |
|
Select
the lines and text for the following groups: CPu graft, 5-HT graft,
Lesioned, DA graft and delete these elements from the image using Edit,
Cut from the drop-down menu, or the  cut icon on the Firework's toolbar. (Tip -
several elements can be selected simultaneously by holding down the
shift key as each separate element is selected.) cut icon on the Firework's toolbar. (Tip -
several elements can be selected simultaneously by holding down the
shift key as each separate element is selected.)
The
image should now show the results for the intact group. Save the image
as intact.png
Open
the file all-groups.png
and create separate files
for each of the remaining groups.
Name
these files:
| Tip
- to save time you can download the existing file(s) |
You
should now have a set of five files each showing the results for one
group of experimental subjects.
Finally,
create an image containing no results for any group and save this file
under the name empty.png
|
 |
| Action |
Screen display |
|
Create
a totally blank image of exactly the same size as the results image
files (use Select, All, Edit, Cut from Firework's drop-down menu bar).
Use the text tool to add the following comment "Intact animals make
very few ipsilateral turns under amphetamine". Save this file with the
name intact_comment.png
Create
a series of blank images with the following comments and save them with
the indicated filenames:
|
Tip
1- you can copy text from Internet Explorer into Fireworks:
- drag
mouse over text in Explorer to highlight it
- click
right mouse button, select Copy from pop-up menu
- open
text editor in Fireworks
- Press
Ctrl V on keyboard - text is copied into text editor
Tip
2 - to save time you can download the existing file(s)
|
"Amphetamine
produces a high level of ipsilateral turning in lesioned rats" saved in
file lesioned_comment.png
"DA
implants reverse the effect of nigrostriatal lesions on
amphetamine-induced ipsilateral turns" saved in file da_comment.png
"5-HT
implants do not reverse the effect of nigrostriatal lesions on
amphetamine-induced ipsilateral turns" saved in file 5ht_comment.png
"CPu
implants do not reverse the effect of nigrostriatal lesions on
amphetamine-induced ipsilateral turns" saved in file cpu_comment.png
|
 |
| Action |
Screen display |
|
Create
a series of gif images from the png files you have created by using the
File, Export option on Firework's drop-down menu bar. Make sure that
the GIF Format is selected, and that the WebSnap adaptive palette is
used.
|
 |
Hands-on activity 2
Using
Microsoft GIF Animator to create a moving image
Here is
an example
(filename gif_animation_webpage.htm) of an animated gif constructed
from the files you created in Hands-on activity 1.
In
Hands-on activity 2 you are invited to recreate this animation.
| Action |
Screen display |
|
Click
on each image in turn and set the display duration to 200 (=2 seconds)
using the Image tab in Microsoft Gif Animator.
Preview
your animation using the  preview
icon. preview
icon.
If
you wish, you can modify the image display duration to show an image
for a longer or shorter period of time
Use
the  Save As.. icon to save your
animation as gif_animation.gif Save As.. icon to save your
animation as gif_animation.gif
Open
the file gif_animation_webpage.htm
in an HTML editor (e.g. Dreamweaver
or Arachnophilia) and insert your animation. View the page in Internet
Explorer.
There
are two important messages on this page:
- constantly
running animations can be very visually distracting
- it
is possible to build controls into web pages that allow the user to interact
with a page to control its behaviour. For example, the user can be
allowed to start or stop an animation.
|
 |
Using
DHTML (Dynamic HTML) to control a moving image
We are
now going to explore how the user can be given the ability to control
the appearance of the web page they are viewing. This is a very
important change in direction in the workshop. Up to now we have
concentrated on creating images that will be shown to the user. But now
we will start to see how interactivity can be built
into a page to involve the end-user and encourage them to become an active
participant in the learning experience.
In
order to do this we will use JavaScript and a concept called the
Document Object Model (DOM). The DOM is a way of identifying - and
thereby gaining control over - elements on a web page.
| Action |
Screen display
|
|
Launch
the HTML editor Macromedia Dreamweaver. Open the file gif_animation_webpage.htm
Use
the commands Edit, Launch External Editor on the drop-down menu bar to
view the HTML code in the HTML text editor Arachnophilia.
|
 |
| Action |
Scroll
down the screen to reveal the HTML code that inserts the animated gif
background image <img src="animated_gif_background.gif"
...> on the web page. This static image is displayed when the
page is loaded.
Notice
that
- the
image object is given an identity <..... id
="animatedgif" ...> and
- the
image is located within an identified FORM tag
within the page <form name="infusion">
These
two identifiers allow us to control what image is displayed at this
position on the page. We can pass this control over to the user so that
they interact with the page to control information display.
|
| Screen display |
 |
| Action |
Screen display
|
|
Scroll
up the screen to reveal the JavaScript and HTML code that allows the
user to start the animation.
- Find
the line containing the HTML tag <body onLoad="init()"
...>
This
code instructs the page to carry out the function "init()" when it has
loaded. Examine this function. It creates an image variable called
animatedImage, and loads the animated gif "gif_animation.gif" into it.
It does not run the animation. It simply downloads the animation, holds
it in computer memory so that it can be displayed instantly when the
user requests to see it. Note that you can change "gif_animation.gif"
to refer to any animation you have created.
<u
onClick="runAnimation()">
start
the animation
</U>
This
text is underlined on the web page (the
<u>...</u> tags control the extent of the
underline).
When
the user clicks this underlined text the function runAnimation()
executes. Locate this function.
- The
line
document.infusion.animatedgif.src = animatedImage.src
swaps
the animated image for the static background image displayed when the
page is first loaded.
|
 |
|
The
function runAnimation() illustrates several important ideas:
It
shows how:
- the
user can be allowed to interact with a web page to
control its appearance and
- the
Document Object Model (DOM) is used to identify an
object - ( document.infusion.animatedgif. ) within
a web page
- objects
have properties that can be changed. For example
the source (document.infusion.animatedgif.src) of an
object can be changed after a page has completely loaded
|
Using
3D Studio Max to interpolate frames
This web
page contains a simple animation created in 3D Studio Max. As
you view the animation the vertical lesioning electrode descends
through the brain. 3D Studio automatically interpolates
a series of images between the first and last images. In order to
create the animation I created the elements shown in the first frame,
and then created the last frame by moving the electrode into its final
position. 3D Studio automatically generated the intermediate frames.
This is clearly much easier than creating an animation frame by frame
and using Microsoft GIF Animator to stitch them together. 3D Studio is
a powerful package used to generate the special effects you see in
films and TV advertisements, but it is expensive and it has a steep
learning curve. Nevertheless you should be aware of the existence of
applications that can save you time if you need to create smooth
animations, rather than the rather jerky sequences produced by
stringing together a series of GIF images.
| First image |
Last image |
 |
|
Hands-on activity 3
Open
this web page and examine the
interactivity offered to the user by the Separator and Overlayer Tools.
This section of the workshop shows you how these tools are coded in
DHTML.
The
Separator Tool
| Action |
Screen display |
|
Open
the file separator_tool.htm
in
Internet Explorer. Click on each of the buttons on the web page to see
how the results for each group in the experiment are displayed
one-at-a-time.
|
Tip
-The Separator Tool uses DHTML (Dynamic HTML) programming techniques
that I have tested in Internet Explorer Version 5. They may not work
under Netscape Navigator.
I
have had to abandon writing web pages that work under both browsers
because of time constraints and the decline in use of Navigator by
visitors to my web site.
|
|
 |
| Action |
Launch
the HTML editor Macromedia Dreamweaver. Open the file separator_tool.htm.
Use
the commands Edit, Launch External Editor on the drop-down menu bar to
view the HTML code in the HTML text editor Arachnophilia.
|
| Screen display |
 |
| Action |
Screen display |
|
Scroll
to the top of the file and view the instructions contained within
<SCRIPT> ......</SCRIPT> tags.
Locate
the function loadImages(). This function executes when the browser
first loads the page:
- assign
variable names to a set of image files (empty.gif; intact.gif;
lesioned.gif; da_graft.gif; 5ht_graft.gif; and cpu_graft.gif)
- creates
an array called my_Image[1...5], and loads the images into this array
- assigns
text to five button variables e.g. var Button1_Text= "Intact group";
Note that this only occurs when the page is loaded into a web browser.
Compare how the page looks in Dreamwever and Internet Explorer.
- displays
the text on the appropriate button on the web page e.g.
document.separator.separator_Button1.value=Button1_Text;
| Tip
- Feel free to use this code as a template which you can modify to
include in your own web pages |
|
 |
Activity
| Action |
Screen display |
|
You
can easily change what is displayed on each button:
- Change
the text in the line var Button1_Text= "Intact group" from "Intact
group" to "I did this".
- Save
your changes by clicking on the disk icon in the Arachnophilia toolbar,
or by selecting File, Save from Arachnophilia's drop-down menu bar.
- Return
to Dreamweaver. Use File, Preview in browser, iexplore to view this
change in the web browser.
|
 |
| Action |
Screen display |
|
You
can easily change what images are displayed by the separator tool. I
have included several extra image files for this purpose in your LTSN
resources folder
A
quick way of making this change is to remove the // marks from the
section of code in the file separator_code.htm. For example change
- //
filename1="new_guinea_warrior.gif"; to
- filename1="new_guinea_warrior.gif";
|
 |
| Tip
- Feel free to use this code as a template which you can modify to
include in your own web pages |
The
Overlayer tool
Open
the file overlayer_tool.htm
in Internet Explorer
Click
on each of the buttons on the web page to see how the results for each
group in the experiment are displayed on the screen. Note how results
for individual groups can be shown or hidden.
Open
overlay_tool.htm
in Dreamweaver
The
Overlayer Tool employs three basic techniques to produce its effects:
| Technique |
Brief
description |
| image
position |
When
the page loads, each image is precisely positioned on top of each other
on the page. The user is presented with a 'stack' of images just like
the pages in a book. If you open a book you only see one page, later
pages in the book are invisible because each page consists of black
text printed on white opaque paper. However .... |
| image
transparency |
Each
image is created with a transparent background. Thus when the images
are positioned on top of each other, lower images can be seen through
the transparent images which lie on top. But in the Overlayer Tool only
selected images are visible at any one time .... |
| image
visibility |
Each
image can be made 'visible' or 'invisible'. This allows control over
which of the lower images can be seen through the transparent images
which overlay it. |
Image
transparency is a property of an image which is built into an
image during its creation. Here are the steps involved in creating the
transparent images used in the Overlayer Tool.
| Action |
Screen display |
|
Open
the file intact.png in Fireworks and export and select File, Export
from the drop-down menu. Use the eyedropper icon to select a colour
that will become transparent. Click on a white area of the graph. Check
that white is rendered transparent. The white are of your image will be
shown as a grey and white checkerboard pattern. Save this file with the
name transparent_intact.gif.
Repeat this process for all your results
gif image files
|
 |
Image
position is controlled by HTML tags in the web page.
| Action |
Locate
the code in the file 'overlayer_tool.htm' which controls the position
of each image on the web page |
| Screen display |
 |
| Action |
Screen display |
|
Use
Window, Layers and Windows, Properties on Dreamweaver's drop-down menus
to examine the layers that are used to control the position of various
layers on the web page.
Use
Arachnophilia to find the line:<div id="OverlayerMainLayer"
style="position:absolute; width:882px; height:440px; ......">
which controls the position of OverlayerMainLayer
Use
the layer icon  to
reposition the OverlayerMainLayer so that it is roughly in the middle
of the screen. Check the effect of this movement in a web browser.
Notice how all the layers within OverlayerMainLayer are also moved. to
reposition the OverlayerMainLayer so that it is roughly in the middle
of the screen. Check the effect of this movement in a web browser.
Notice how all the layers within OverlayerMainLayer are also moved.
Check
the effect of this movement in Arachnophilia
|
Tip
-layers allow you to position the Overlayer tool exactly where you want
it on the screen
|
|
 |
Image
visibility
| Action |
Screen display |
|
The
Overlayer Tool allows the user to control image visibility.
When
the user presses one of the five buttons on the web page the value of
the button (1,2...5) is passed as a parameter to the function
layer_Images()
|
 |
| Action |
Screen display |
|
The
function layer_Images(image_To_Layer) checks if the corresponding image
is currently visible or hidden. It toggles the image's visibility:
- a
hidden image is made visible;
- a
visible image is hidden.
It
also toggles the text displayed on the image's button between "Add ..."
and "Hide ..."
In
addition to controlling image position and visibility
'overlayer_tool.htm'
contains instructions which
- loads
a set of image files
- creates
an array and loads the images into this array
- assigns
text to button variables
- displays
the text on the appropriate button on the web page
This
code is very similar to that you encountered in discussion of the
Separator Tool.
|
 |
| Tip
- Feel free to use this code as a template which you can modify to
include in your own web pages |
